ROBUSKEY® Operation Guide
for Video ( Macintosh/Windows )
June 20, 2012
Copyright © 2010 - 2011 Research Institute of Systems Planning,Inc. All rights reserved.
This file is subject to change without any notice. Research Institute of Systems Planning, Inc. / ISP does not assume the responsibility on any errors or inaccuracies in this file, and even if the reader is disadvantaged by what is described in this file, and assumes no responsibility or no compensation. Reproductions/distributions in any form for purposes other than personal use require Research Institute of Systems Planning Inc. / ISP's written permission. The permission must be obtained prior to use. However, this does not restrict any rights that Japanese Copyright Law does not set forth.
Table of Contents
What is Operation Guide for?
This document describes how to operate ROBUSKEY® for Video when you would like to make a Chroma-Key image synthesis. If you were very new to ROBUSKEY® for Video, or if you find some difficulties on using ROBUSKEY® for Video, this document might be helpful to you.
For installation / activation, see "ROBUSKEY® Installation Guide".
Back to Table of Contents
What is ROBUSKEY for Video?
Contents of ROBUSKEY
ROBUSKEY® for Video is a set of plugin software for Chroma-Key runs on After Effects, Premiere Pro and Final Cut Pro.
ROBUSKEY® for Video consists of following plugins.
| Operating System |
Host Application |
Plugins to be Installed |
| Macintosh |
After Effects CS3, CS4, CS5, CS5.5, CS6, CC | RobuskeyMovieGreen v1.0
RobuskeyMovieBlue v1.0
Clip Alpha v1.0
|
| Premiere Pro CS5, CS5.5, CS6, CC | RobuskeyMovieGreen v1.1
RobuskeyMovieBlue v1.1
|
| Final Cut Pro 7, X | ROBUSKEY Green v1.1
ROBUSKEY Blue v1.1
|
| Motion 5 | ROBUSKEY Green v1.1
ROBUSKEY Blue v1.1
|
| Windows | After Effects CS3 | RobuskeyMovieGreen v1.0
RobuskeyMovieBlue v1.0
Clip Alpha v1.0
|
| After Effects CS4, CS5, CS5.5, CS6, CC | RobuskeyMovieGreenGPU v1.1
RobuskeyMovieBlueGPU v1.1
Clip Alpha v1.0
|
| Premiere Pro CS5, CS5.5, CS6, CC | RobuskeyMovieGreenGPU v1.1
RobuskeyMovieBlueGPU v1.1
|
| EDIUS | ISP ROBUSKEY Green v1.0
ISP ROBUSKEY Blue v1.0
ISP Clip Alpha v1.0
|
Here is brief description of each plugin.
| Plugin |
Description |
| RobuskeyMovieGreenGPU v1.1 | Plugin for green background synthesis (GPU acceleration supported) |
RobuskeyMovieGreen v1.0
RobuskeyMovieGreen v1.1
ROBUSKEY Green v1.1
| Plugin for green background synthesis |
| RobuskeyMovieBlueGPU v1.1 | Plugin for blue background synthesis (GPU acceleration supported) |
RobuskeyMovieBlue v1.0
RobuskeyMovieBlie v1.1
ROBUSKEY Blue v1.1
| Plugin for blue background synthesis |
| Clip Alpha v1.0 | Plugin for Clip Alpha |
System Requirement
In principle, ROBUSKEY® for Video's system requirement conforms to that of host application (After Effects, Premiere Pro, Final Cut Pro, EDIUS). For the latest system requirement and operating system support status, please check ROBUSKEY® for Video Website.
- Supported Host Application
- Adobe® After Effects® CS3 or later (CS5 or later recommended)
- Adobe® Premiere® Pro CS5 or later
- Final Cut Pro 7,X
- Motion 5
- EDIUS 6,6.5
- Supported Operating System
- Macintosh / Windows
- for Final Cut Pro 7, X supports Macintosh only
- for Motion 5 supports Macintosh only
- for EDIUS 6,6.5 supports Windows only
- Supports GPU Acceleration
- NVIDIA GeForce which supports CUDA™ with 512 megabyte or more of local graphic memory, Quadro series graphic card
- Supported Color Depth
- 8bit / channel
† 64bit OS, such as Mac OS X v.10.6, Windows Vista, Windows 7 are also supported.
† For Macintosh, ROBUSKEY supports Intel processor.
† GPU Accerelation is available on After Effects CS4 or later, Premiere Pro CS5 or later and EDIUS 6, 6.5, only for Windows.
† Computers are required to be online on product activation.
Back to Table of Contents
Suitable Background Color for ROBUSKEY
Back to Table of Contents
The Basic Operation
Here describes ROBUSKEY® for Video's screen instruction and basic operation. For Further Information and Tips, see ROBUSKEY® for Video Website.
How to Apply ROBUSKEY
for After Effects
- Run After Effects, import your source video clip (green background / blue background) you would like to synthesize.
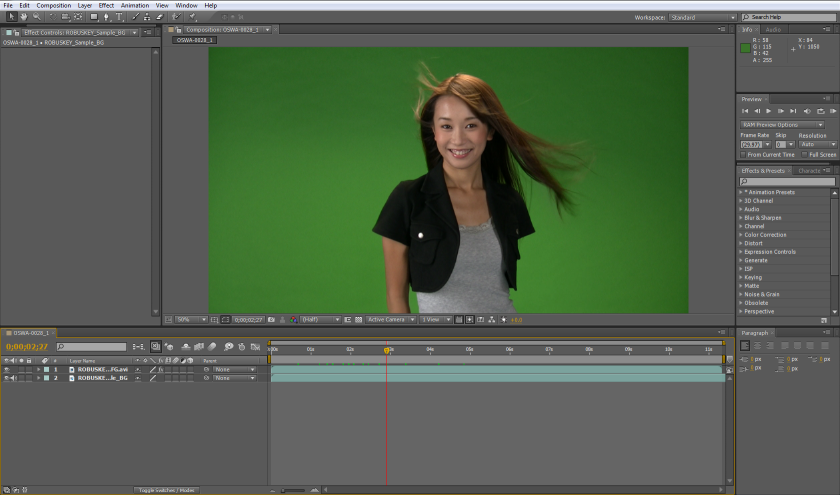
At the point of import source video clip is loaded.
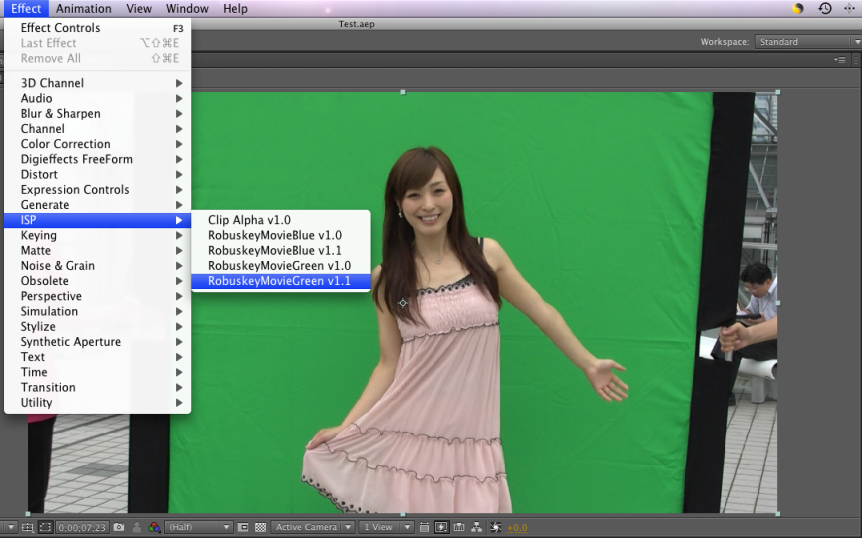
- If source video clip is green background, select menubar > Effects > ISP > RobuskeyMovieGreen v1.0 or RobuskeyMovieGreenGPU v1.1 . ROBUSKEY's Effect Control Panel will appear.
If source video clip is blue background, select RobuskeyMovieBlue v1.0 or RobuskeyMovieBlueGPU v1.1 .
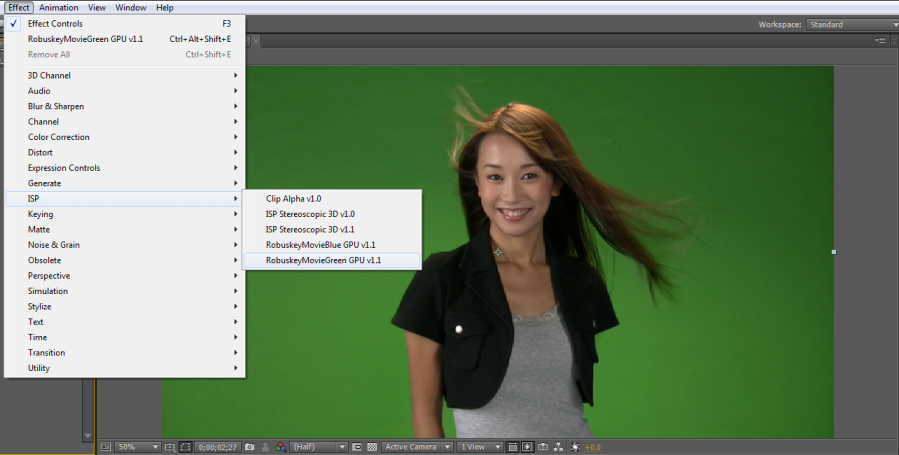
At the point of selecting plugin.

ROBUSKEY's Effect Control Panel
for Premiere Pro
- Run Premiere Pro, import your source video clip (green background / blue background) you would like to synthesize.
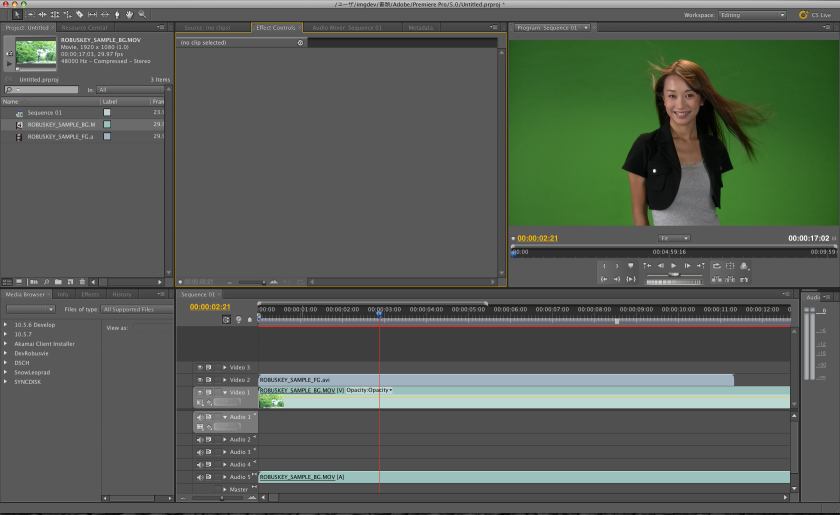
At the point of import source video clip is loaded.
- If source video clip is green background, grab "Effects" > "ISP" > "RobuskeyMovieGreen v1.1" or "RobuskeyMovieGreenGPU v1.1" from Effect Window, drag & drop on source video of the sequence you would like to apply ROBUSKEY. ROBUSKEY will appear in Effect Control Window.
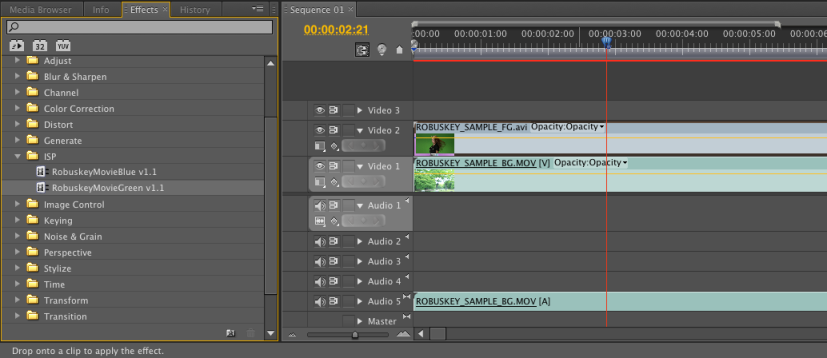
Drag Effect and Drop on a Video Clip.
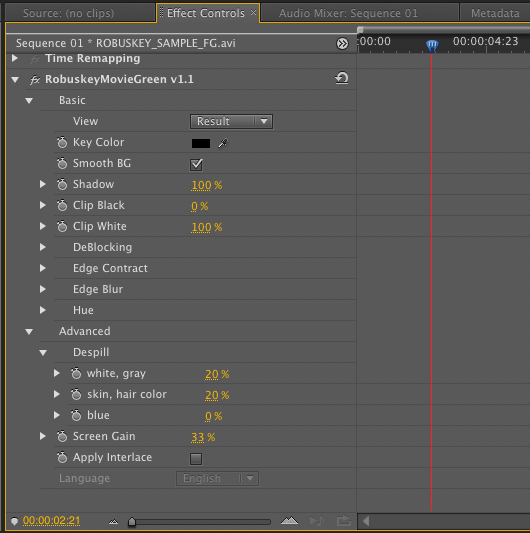
ROBUSKEY's Effect Control Panel
for Final Cut Pro 7
- Run Final Cut Pro, import your source video clip (green background / blue background) you would like to synthesize.
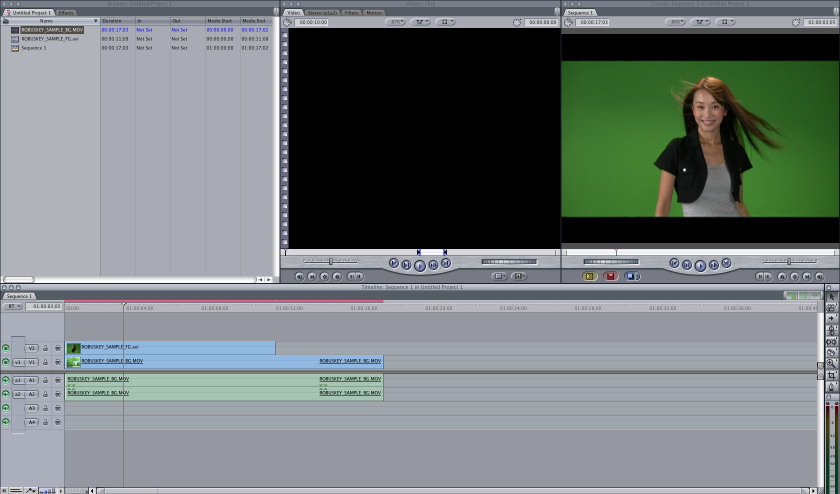
At the point of import source video clip is loaded.
- If source video clip is green background, select "Effects" > "Video Filters" > "ISP" > ROBUSKEY Green v1.1" . ROBUSKEY will appear on Filter tab of Viewer Window.
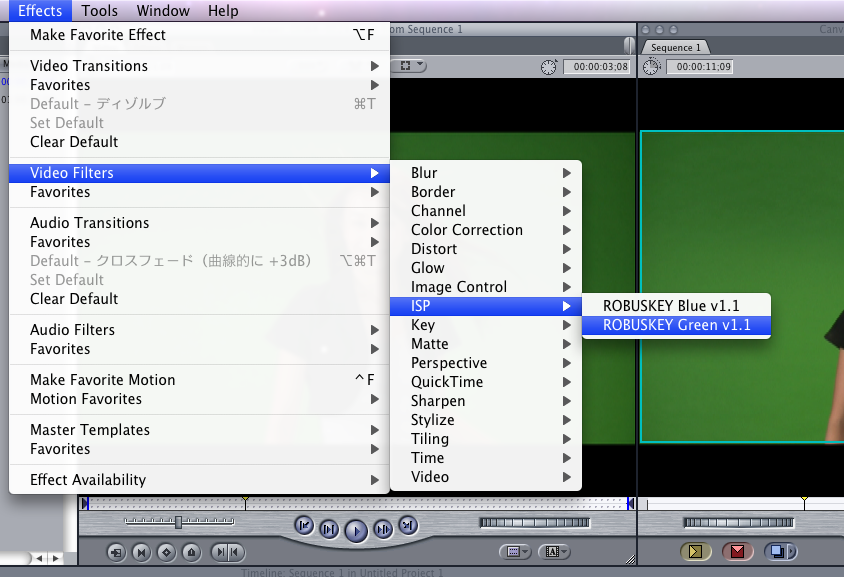
Select plugin from toolbar.

ROBUSKEY's Effect Control Panel
for Final Cut Pro X
- Run Final Cut Pro X, import your source video clip (green background / blue background) you would like to synthesize.

At the point of import source video clip is loaded.
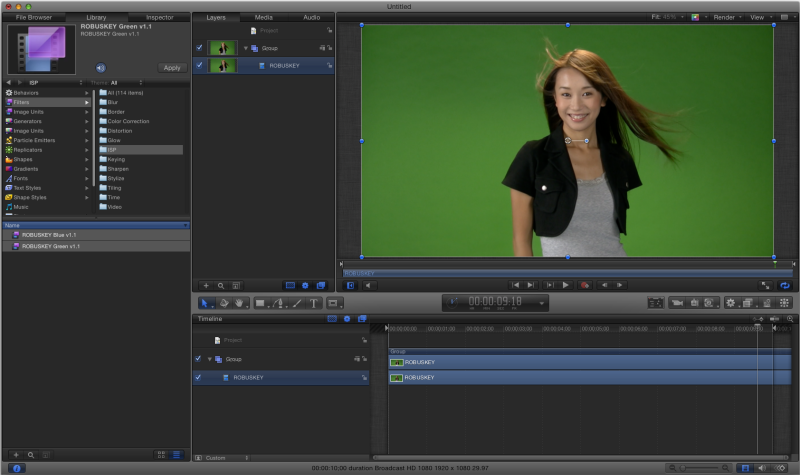
- If source video clip is green backgound, select "ISP" > "ROBUSKEY Green v1.1", drag & drop it to the video clip you would like to apply. Please check if ROBUSKEY appeared in information window.
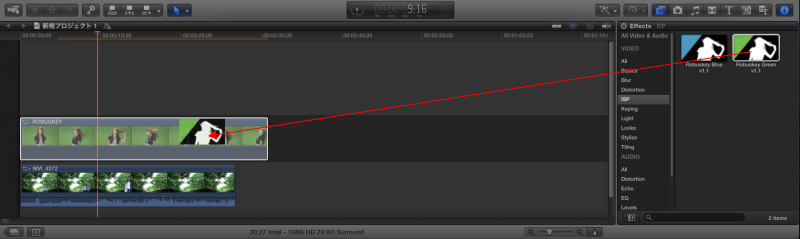
Select the plugin from effect browser.

ROBUSKEY's Effect Control Panel
for Motion 5
- Run Motion 5, import your source video clip (green background / blue background) you would like to synthesize.
At the point of import source video clip is loaded.
- If source video clip is green backgound, select "Library" > "Filter" > "ISP" > "ROBUSKEY Green v1.1", drag & drop it to the video clip you would like to apply. Please check if ROBUSKEY appeared in "Inspector" > "filter".

Select the plugin from Library.
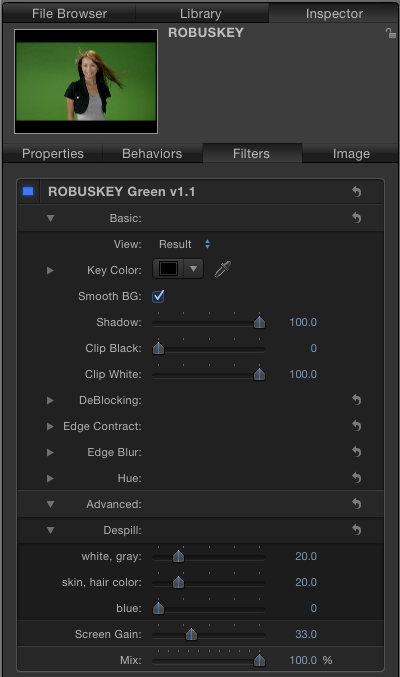
ROBUSKEY's Effect Control Panel
for EDIUS
- Run EDIUS, import your source video clip (green background / blue background) you would like to synthesize.
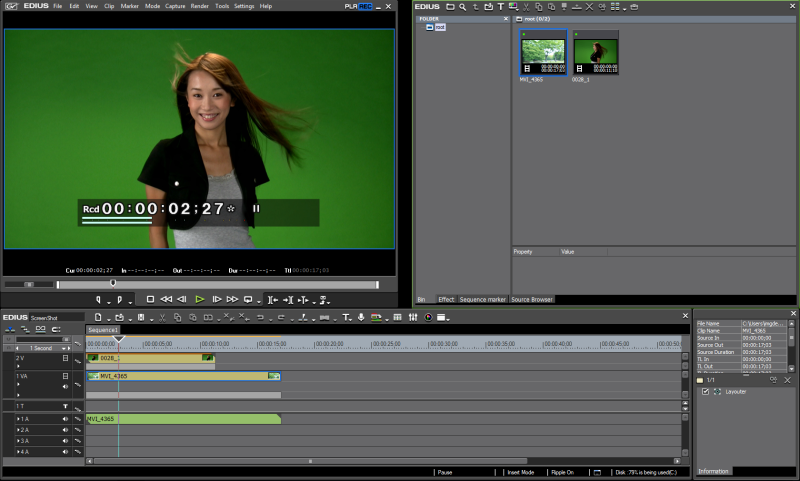
At the point of import source video clip is loaded.
- If source video clip is green background, grab "Effects" > "Video Filters" > "ISP" > "ROBUSKEY Green v1.0" or "RobuskeyMovieGreenGPU v1.1" from Effects Panel, drag & drop on source video of the sequence you would like to apply ROBUSKEY. ROBUSKEY will appear in Information Panel.
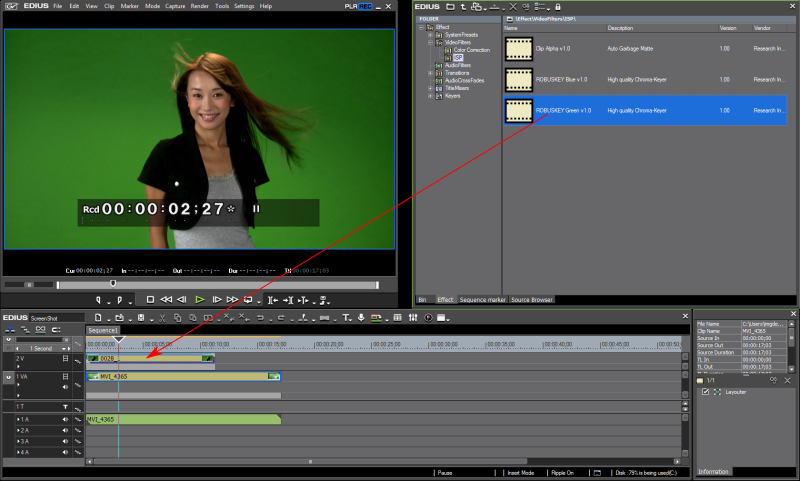
Drag Effect and Drop on a Video Clip.
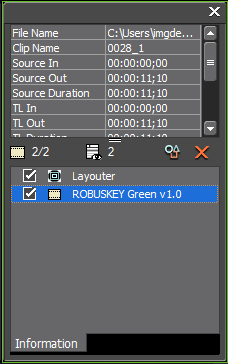
ROBUSKEY in Information panel
- Double click " > "ISP ROBUSKEY Green v1.0" in Information Panel, ROBUSKEY's Effect Control Panel will appear.
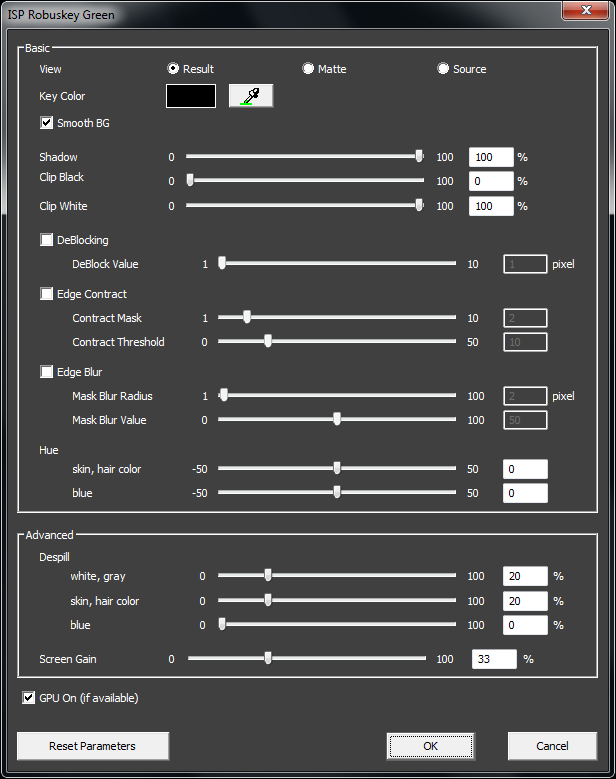
ROBUSKEY's Effect Control Panel
How to Chroma Keying with ROBUSKEY
Examples described here is for After Effects. Basic operation is the same for Premiere Pro, Final Cut Pro and EDIUS.
- Select eyedropper tool, click green background / blue background on composition panel. Also Color Picker is available.
Select where is close to subject and brighter.

Click green background / blue background
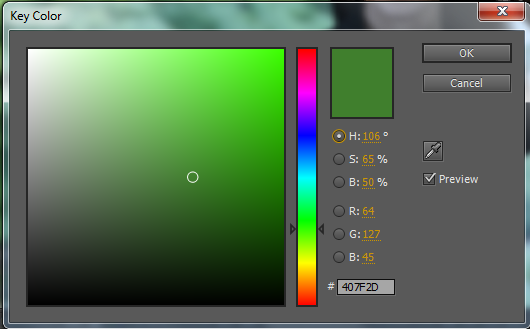
Color Picker
- By "View" menu on ROBUSKEY's Effect Panel, you can switch displaying source image, matte image and synthesis result.
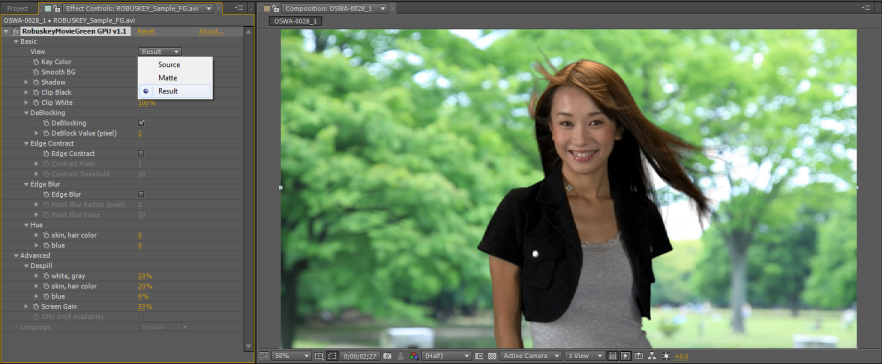
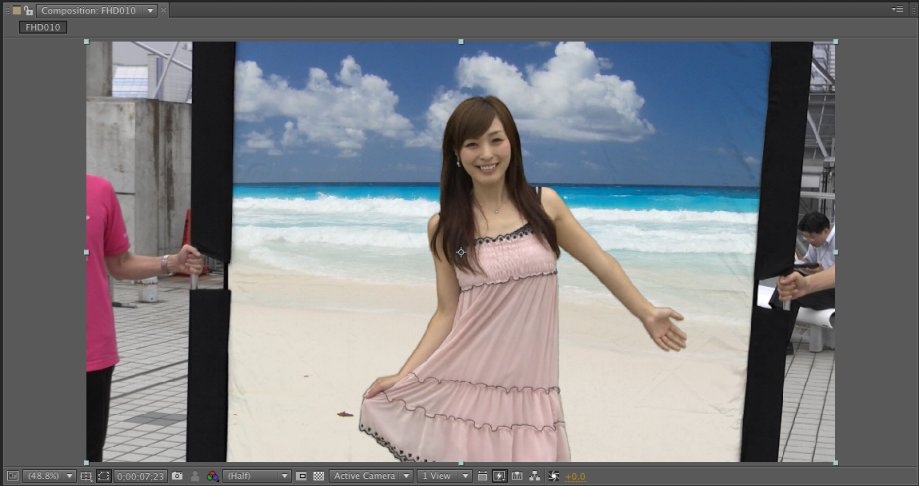
Displaying Synthesized Result with Background Image
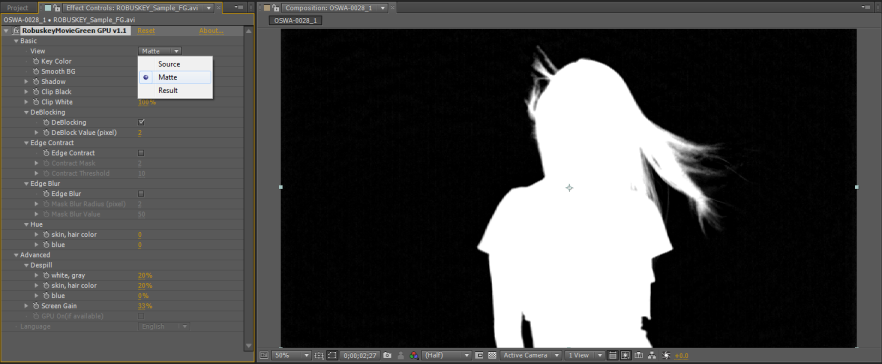
Displaying Matte Image
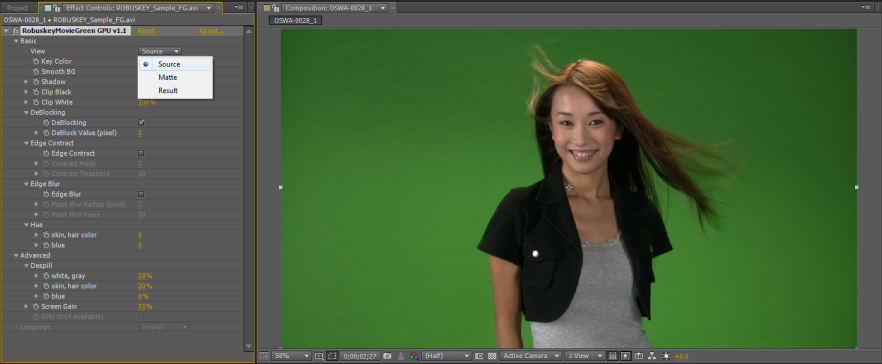
Displaying Source Image
- On Environment which supports GPU acceleration, "GPU On" checkbox will be checked. If not, the checkbox will be disabled.
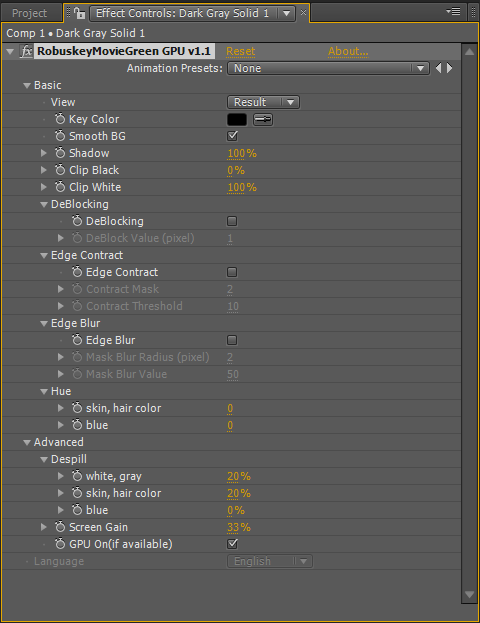
On Environment which Supports GPU Acceleration
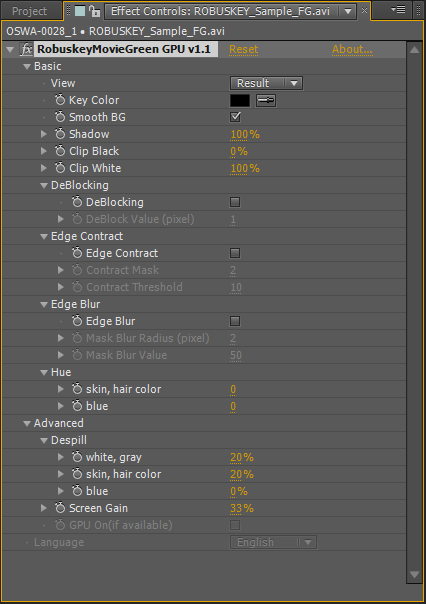
On Environment which does not Support GPU Acceleration
Back to Table of Contents
Auto Mask Correction: Clip Alpha after Chroma Keying
† After Effects and EDIUS supports Clip Alpha. Premiere Pro and Final Cut Pro users are not able to use this feature.
Using "Clip Alpha" after Chroma-Keying with ROBUSKEY, matte (alpha channel) will automatically be adjusted. It is useful on fine-tuning for deleting unwilling background.
- Perform chroma-keying with ROBUSKEY.
Perform chroma-keying with ROBUSKEY
Unwilling objects are still remain
- Select "Effect" > "ISP" > "Clip Alpha v1.0" from toolbar.
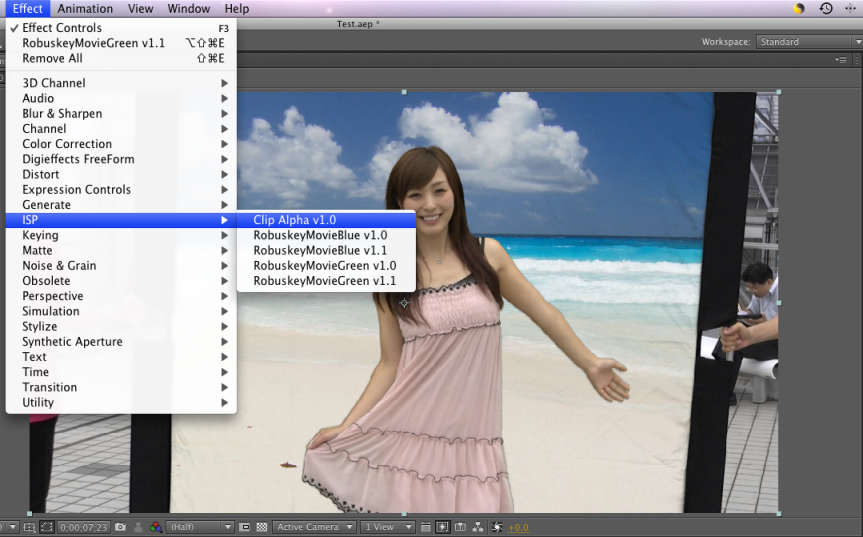
Selecting Clip Alpha from Effect menu.
- Select "Select" > "Auto Clip" from Clip Alpha v1.0 panel, and select "Matting" > "from Alpha".
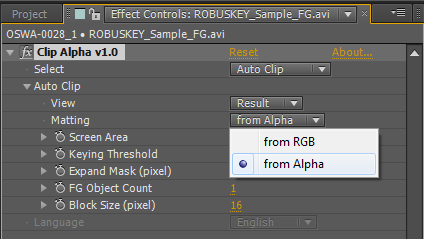
Select "Auto Clip" from "Clip Alpha" panel
- Alpha channel is automatically adjusted by determining unnecessary part from what chroma-keying remained.
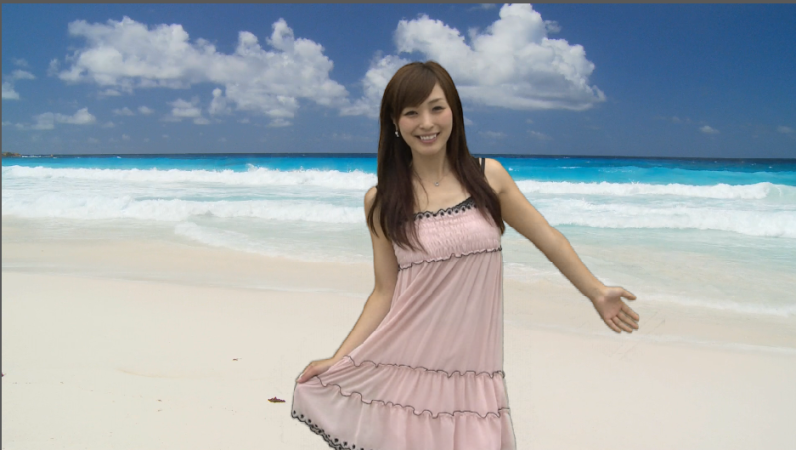
Synthesized result applying Clip Alpha
For EDIUS, Select "from Alpha" in "Matting".
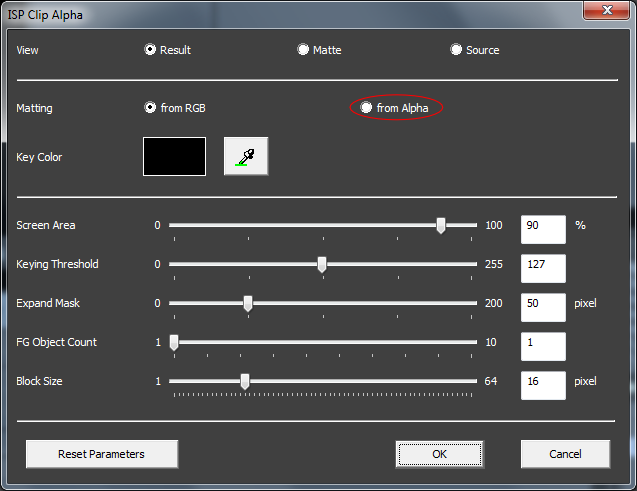
Clip Alpha on EDIUS
Back to Table of Contents
Auto Mask Maker: Clip Alpha before Chroma Keying
† Only After Effects supports Auto Mask Maker on Clip Alpha. Premiere Pro, Final Cut Pro and EDIUS users are not able to use this feature.
By applying "Mask Maker" of Clip Alpha, prior to ROBUSKEY image synthesis, a mask hiding unwilling objects will automatically generated.
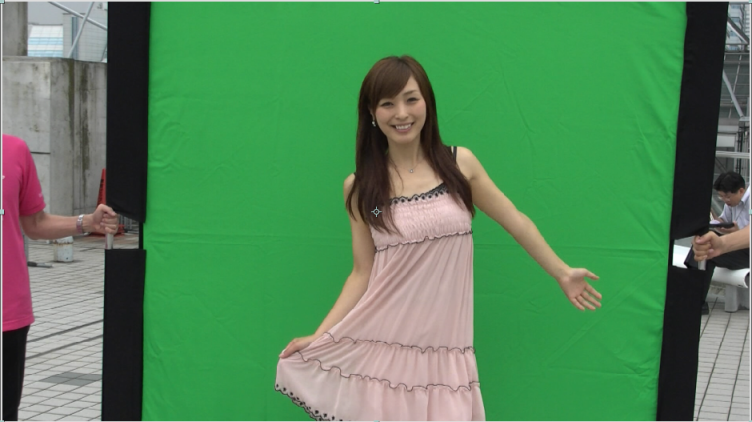
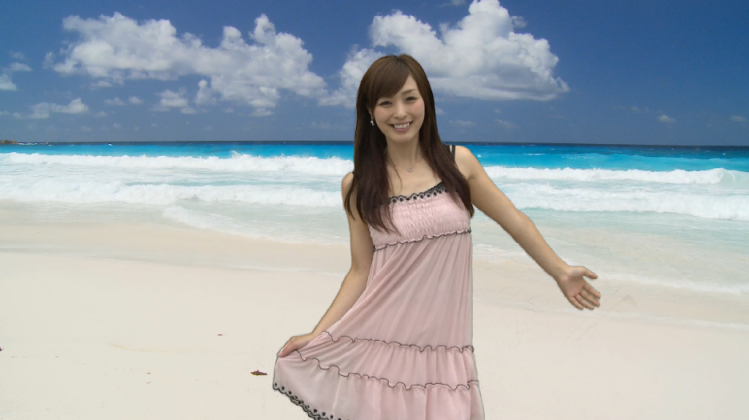
- Source image has unwilling parts. To remove those parts, you had to generate a mask manually.
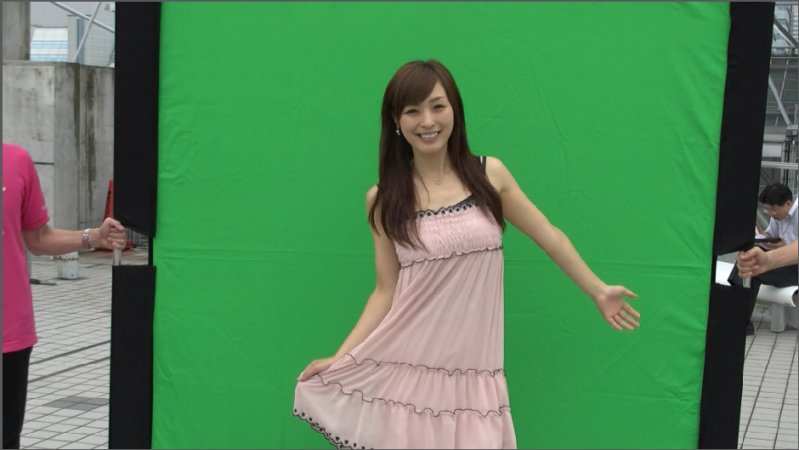
Sometimes green background is not large enough.
- Select "Effect" > "ISP" > "Clip Alpha v1.0" from toolbar.
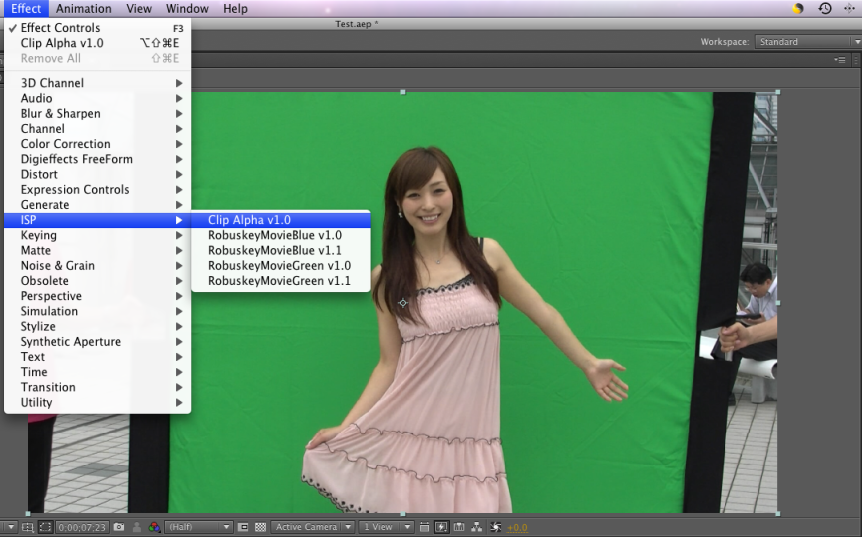
Select "Clip Alpha" from Effect menu
- Select "Select" > "Mask Maker" from Clip Alpha panel.
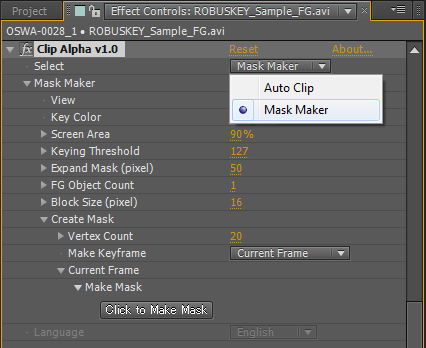
Select "Mask Maker" from Clip Alpha panel
- Select eyedropper tool from Key Color, click green (or blue) background to pick up key color for mask generation.
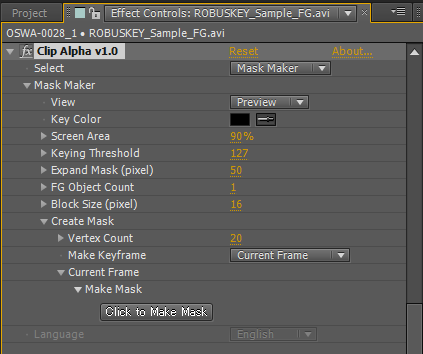
Key Color menu from Mask Maker
Select key color for Mask Maker
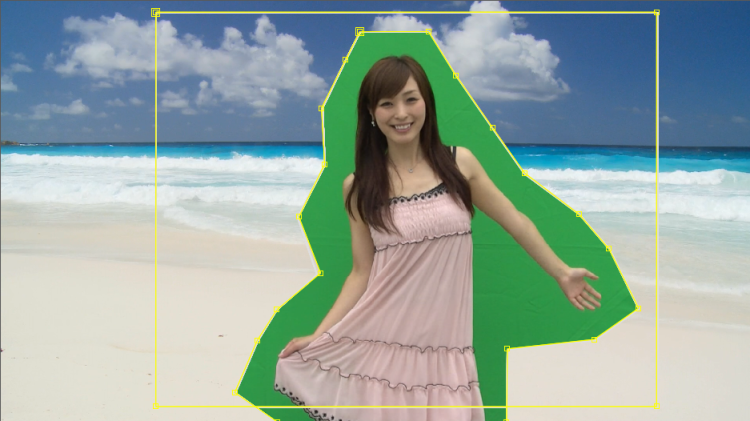
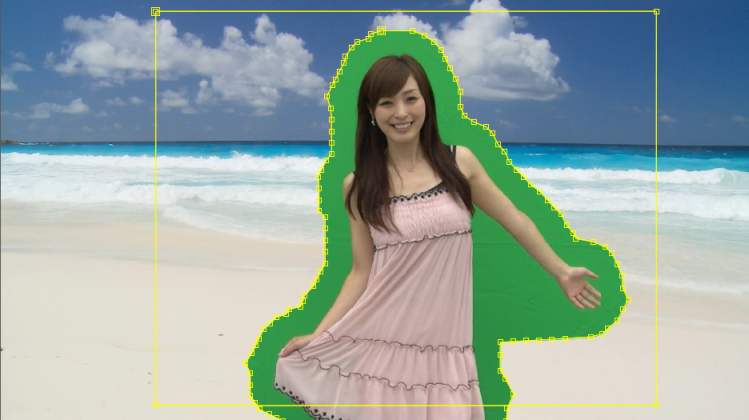
Previewing mask which Mask Maker generated.
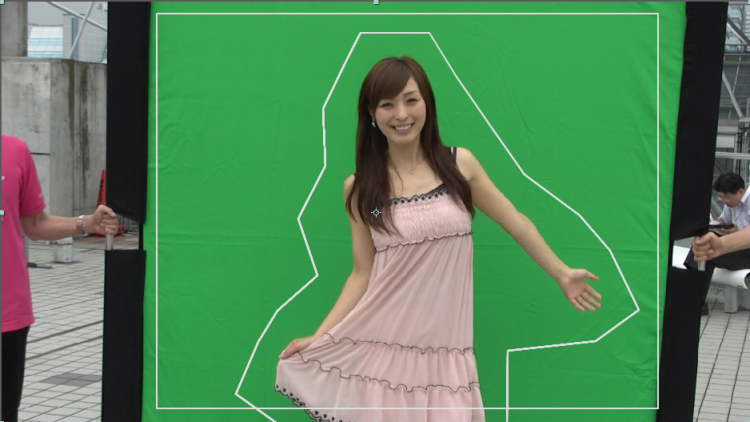
- If it seems ok with you, click "Click to Make Mask" button to generate mask. If "Make Keyframe" is set to "Current Frame", Mask Maker generates mask using current frame as key frame.
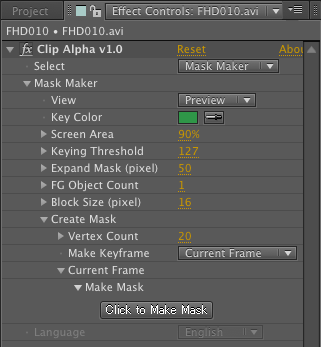
Click "Click to Make Mask" button to generate a mask.
Mask generation has done.
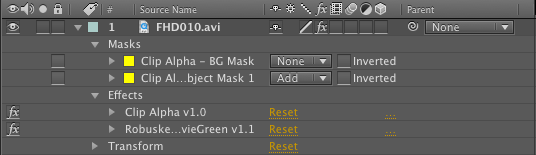
Generated mask is shown as a layer
Mask is automatically generated.
- After generating mask, perform chroma-keying with ROBUSKEY.
Synthesized result applying ROBUSKEY.
[Notice]
- If you change the number of vertex or expand mask, the shape of the mask will be changed and existing mask will be overwritten.
- Masks which Clip Alpha generated will not be deleted if you uninstall ROBUSKEY. If you don't need ROBUSKEY, you need to delete those masks manually.
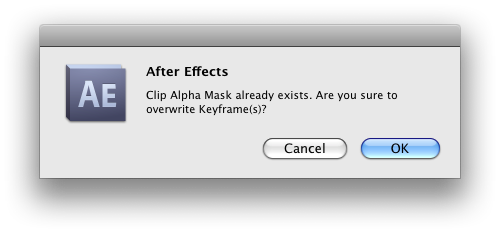
Masks may be overwritten.
Mask with more vertex.
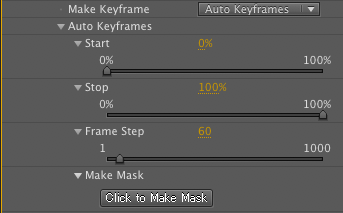
- If you select "Auto Keyframes" at "Make Keyframe" menu, Clip Alpha will generate keyframes automatically (by default, every 60 frames). This process may take a long time for long video clip. Click somewhere on the screen to stop.
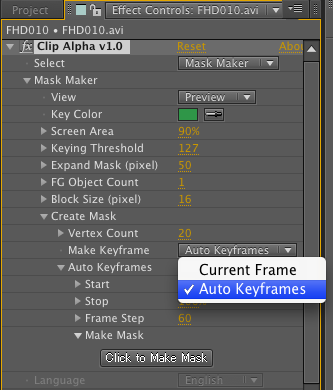
Select "Auto Keyframes" on "Make Keyframe" menu
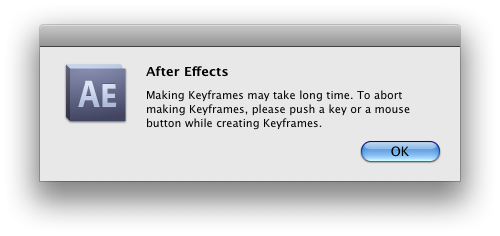
Warning dialog on generating mask with Auto Keyframes
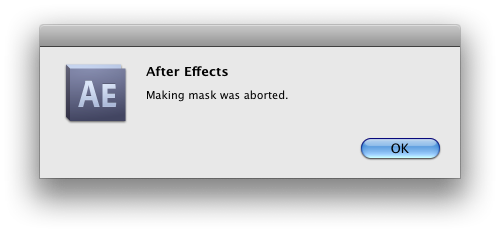
Message Dialog on aborting generating mask with Auto Keyframes
Back to Table of Contents
Parameters List
Here describes brief explanation about ROBUSKEY and Clip Alpha's parameters.
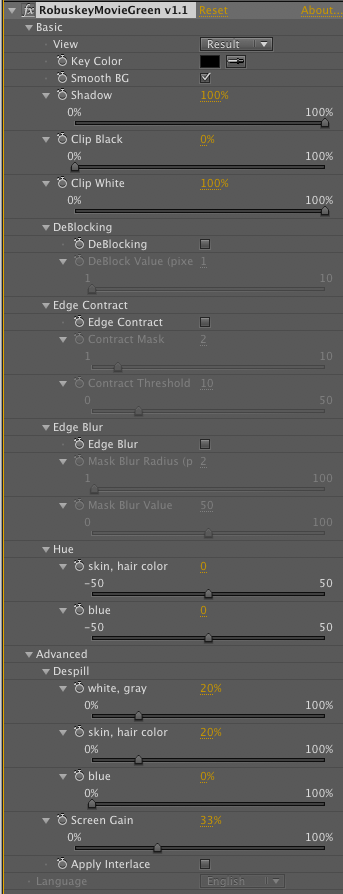
ROBUSKEY Movie Green
|
Basic Menu
| Parameter |
Description |
| View |
Source |
Displays source video. |
| Matte |
Displays alpha channel. |
| Result |
Displays chroma keying result. |
| Key Color |
Specifies key color of chroma keying. |
| Smooth BG |
Smooths background's irregularities on synthesizing. |
| Shadow |
Adjusts amount of shadows of the objects on synthesizing. |
| Clip Black |
Adjusts the portion you would like to remove the post-chroma keying alpha channel. |
| Clip White |
Adjusts the portion you would like to retain the post-chroma keying alpha channel. |
| DeBlocking |
check box |
Enables soften block noise caused by CODEC input. |
| DeBlock Value (pixel) |
Adjusts the range of blur the block noise, set by pixel. |
| Edge Contract |
check box |
Expands / shrinks mask. |
| Contract Value |
To shrink the mask, the higher value to be set.
|
| Contract Threshold |
Adjusts threshold for edge contract. |
| Edge Blur |
check box |
Enables edge blur. |
| Mask Blur Radius (pixel) |
Adjusts the radius of the area of edge blur, set by pixel. |
| Mask Blur Value |
The higher value is set, the more blur will be applied. |
| Hue |
skin, hair color |
Removes the reflection of skin and hair. |
| blue |
Removes blueish reflection of transparent material. |
|
Advanced Menu
| Parameter |
Description |
| Despill |
white, gray |
Removes green spilt to white, black and gray objects. |
| skin, hair color |
Removes green spilt to skin and brown hair. |
| blue |
Removes green spilt to transparent objects. |
| Screen Gain |
Uses when the color range of background is too wide to perform chromakey correctly.
|
| Apply Interlace |
Enables interlace process. |
| Use GPU (GPU supported environment only) |
Enables GPU acceleration. |
|
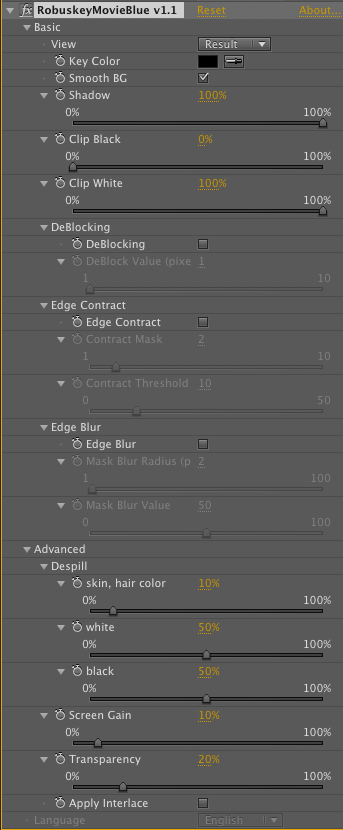
ROBUSKEY Movie Blue
|
Basic Menu
| Parameter | Description |
|---|
| View | Source |
Displays source video. |
| Matte |
Displays alpha channel. |
| Result | Displays chroma keying result. |
| Key Color | Specifies key color of chroma keying. |
| Smooth BG | Smooths background's irregularities on synthesizing. |
| Shadow | Adjusts amount of shadows of the objects on synthesizing. |
| Clip Black | Adjusts the portion you would like to remove the post-chroma keying alpha channel. |
| Clip White | Adjusts the portion you would like to retain the post-chroma keying alpha channel. |
| DeBlocking |
check box | Enables soften block noise caused by CODEC input. |
| DeBlock Value (pixel) | Adjusts the range of blur the block noise, set by pixel. |
| Edge Contract |
check box | Expands / shrinks mask. |
| Contract Mask | To shrink the mask, the higher value to be set. |
| Contract Threshold |
Adjusts threshold for edge contract. |
| Edge Blur |
check box | Enables edge blur. |
| Mask Blur Radius | Adjusts the radius of the area of edge blur, set by pixel. |
| Mask Blur Value | The higher value is set, the more blur will be applied. |
|
Advanced Menu
| Parameter |
Description |
|---|
| DeSpill |
skin, hair color |
Removes blue spilt to skin and brown hair. |
| white |
Removes blue spilt to white objects: white shirt tinged beige or pink. |
| black |
Removes blue spilt to black objects: black hair tinged brown. |
| Screen Gain | Uses when the color range of background is too wide to perform chromakey correctly. |
| Transparency | Increases this value when details such as strand of black hair are lost.
|
| Apply Interlace (GPU supported environment only) | Enables interlace process. |
| Use GPU (GPU supported environment only) | Enables GPU acceleration. |
|
Clip Alpha
|
|
Basic Menu
| Parameter | Description |
|---|
| Select | Auto Clip | Generates garbage matte automatically. Use this prior to chroma keying.
|
| Mask Maker | Generates garbage matte by After Effects mask. Use this after chroma keying.
|
|

|
Auto Clip Menu
| Parameter |
Description |
|---|
| View | Source | Displays source video. |
| Matte | Displays alpha channel. |
| Result | Displays chroma keying result. |
| Matting |
from RGB |
Generates mask from RGB. |
| from Alpha |
Generates mask from alpha channel. |
| Kay Color |
Specifies key color for garbage matte generation. |
| Screen Area |
Specifies background area. |
| Keying Threshold |
Increases this value when strand of hair or tranparent objects are not recognized as subject.
|
| Expand Mask |
Adjusts the distance from subject to mask. |
| FG Object Count |
Specifies the number of subjects. |
| Block Size (pixel) | Adjusts the precision to determine the subject. The process may slow down when this value is low.
|
|
|
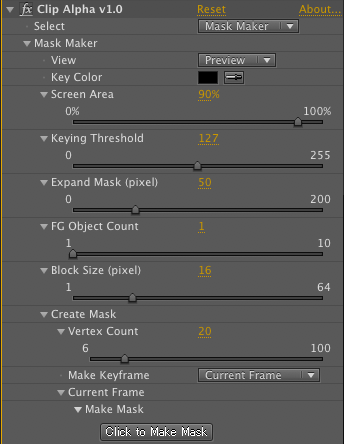
Mask Maker Menu
| Parameter |
Description |
|---|
| View | Preview |
Previews garbage matte. |
| Source | Displays source video. |
| Key Color | Specifies key color of chroma keying. |
| Screen Area | Specifies background area. |
| Keying Threshold | Increases this value when strand of hair or tranparent objects are not recognized as subject. |
| Expand Mask (pixel) | Adjusts the distance from subject to mask. |
| FG Object Count | Specifies the number of subjects. |
| Block Size (pixel) | Adjusts the precision to determine the subject. The process may slow down when this value is low. |
| Vertex Count |
Specifies the number of vertex of mask to be generated. |
| Create Mask | |
| Make Keyframe | Current Frame |
Uses current frame as keyframe. |
| Auto Keyframes |
Uses multiple frames as keyframe. |
| Auto Keyframes |
Start |
Specifies starting position of auto mask generation. |
| Stop |
Specifies finishing position of auto mask generation. |
| Frame Step |
Specifies interval of mask generation. Set by number of frame. |
|
|
|
Back to Table of Contents
Troubleshooting
- Q: I'm interested in image synthesis but I'm very new to it. Could you demonstrate how to use it for me?
- A: Demonstration is available at our office (Shibuya, Tokyo). Please contact ROBUSKEY Support Desk.
- Q: Not living in Japan, it's hard for me to go to your office. Don't you have any other support?
- A: Please contact ROBUSKEY Support Desk.
Back to Table of Contents
Support Information
Back to Table of Contents
Copyright © 2010 - 2011 Research Institute of Systems Planning,Inc. All rights reserved.
†AdobeR, Adobe After EffectsR and Adobe Premiere ProR are registered trademark of Adobe Systems Incorporated. in United States and other countries.
†AppleR and Final Cut ProR are registered trademark of Apple Incorporated. in United States and other countries.
†EDIUS is a registered trademark and Grass Valley and Infinity are trademarks of Technicolor USA, Inc.
†WindowsR is a registered trademark of Microsoft Coporation in United States and other countries.
†ROBUSKEYR is a registered trademark of Research Institute of Systems Planning Incorporated.
†Other names / company names / product names mentioned above are trademarks or registered trademarks of their respective owners.
 HSB color system
 HSB color system
 HSB color system
 HSB color system
 HSB color system
 HSB color system
 HSB color system
 HSB color system